Moving Stuff Around and How To Put It Back
There are many ways to customize SOLIDWORKS. This article will address the command interface elements. We will talk about how to reposition them, and how to return these elements to their default positions.
The CommandManager
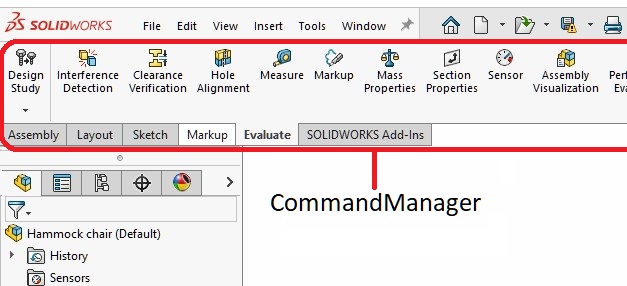
Open any SOLIDWORKS document and you should see the CommandManager. It’s that giant toolbar at the very top of the screen. If you are still using standard Toolbars and have them docked or scattered all over the place, maybe it’s finally time to hop on board the band wagon and give the CommandManager a try. It really is worth spending a few moments adapting to it, and letting the CommandManager make you more efficient at accessing commands.
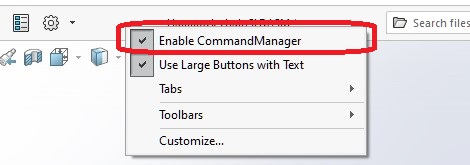
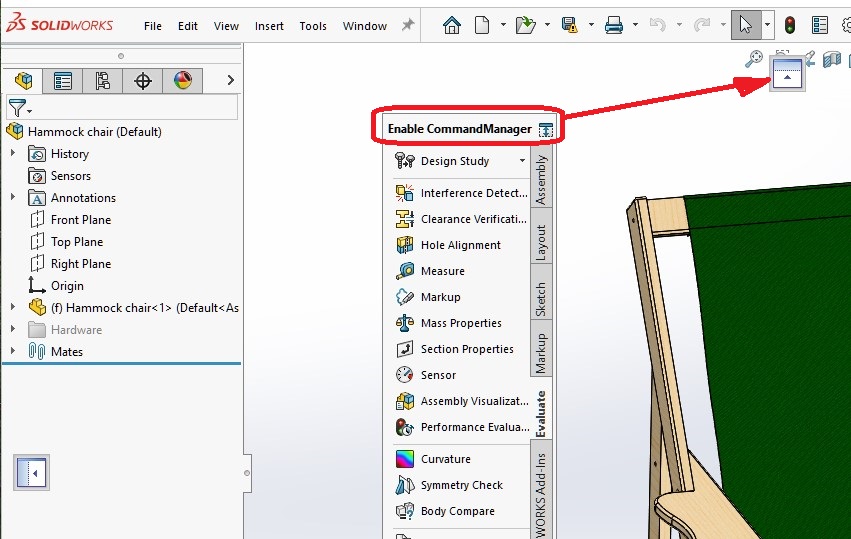
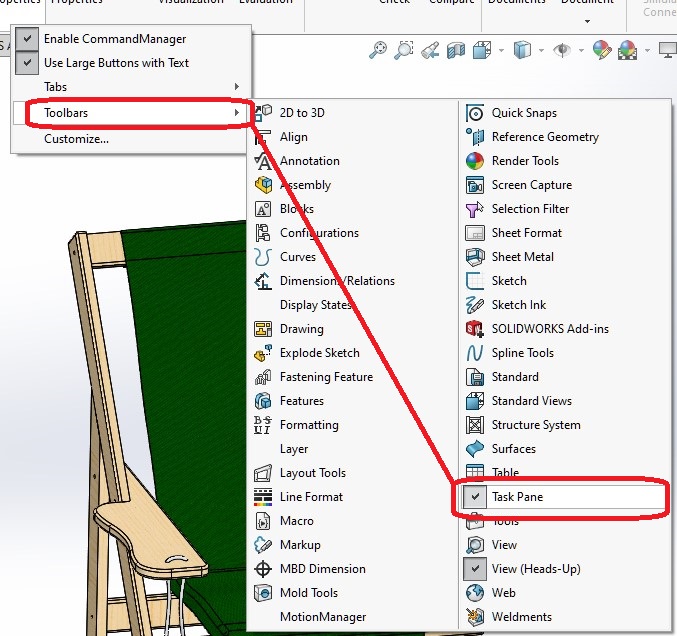
A very common question in the area of SOLIDWORKS technical support is “I’ve lost my CommandManager and don’t know how to get it back”. If that is the case, try making sure it’s enabled. Right click on any toolbar (or the SOLIDWORKS title bar, as shown in Image 2), and ensure “Enable CommandManager” is checked.
If the CommandManager is enabled and you would like to get it back to it’s default position, drag it with your left mouse button. As soon as you start dragging the CommandManager, 3 symbols will appear. Dropping the CommandManager onto one of these 3 symbols will dock it to the left, right, or top of the screen. Two of these symbols are shown in the image below.
The CommandManager can be resized like any window, or placed on another screen. To position the CommandManager somewhere other than it’s default location, drag it by any one of it’s tabs (or it’s title bar, if it is not docked). To add or remove tabs, right click any existing tab and access the Tabs menu. Since there are different tabs for each of the 3 main SOLIDWORKS document types (parts, assemblies, and drawings), it’s possible to customize the tab selection for each.
The Task Pane
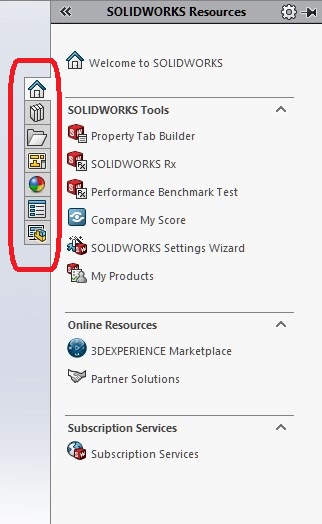
Similar to the CommandManager, the Task Pane can also be turned on and off. It is occasionally turned off by accident by SOLIDWORKS users who do not know its’ name. The Task Pane is the name for the interface on the right side of the screen that consists of a series of vertically oriented tabs, as shown below.
If the tabs are missing, try turning the Task Pane on by right clicking any visible toolbar (or the CommandManager or the SOLIDWORKS title bar), expand the Toolbars menu, and ensure Task Pane is checked.
The Task Pane can be repositioned by dragging it by it’s title bar. To access the title bar, click any of the tabs. Like the CommandManager, the Task Pane can be placed on another screen. To pin the Task Pane so it stays open all the time, click the small pin in it’s top right corner. If the Task Pane is not pinned, clicking anywhere other than within the Task Pane will make it collapse down to it’s minimum size.
Unlike the CommandManager, the Task Pane cannot be docked anywhere other than it’s default location. When dragging the Task Pane title bar, no symbols will appear. However, if it is dragged near the right side of the screen, it will snap into position. There will also be a small icon near the pin which will allow for docking the Task Pane. The Dock Task Pane icon is only visible if the Task Pane is currently not docked.
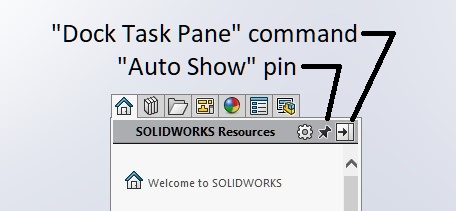
The Auto Show pin works like any other pin in the sense that when “pinned”, the Task Pane stays visible all the time. When unpinned, Auto Show is considered to be on. In such a case, the Task Pane will hide itself unless a tab on the Task Pane (or it’s title bar) is clicked.
The PropertyManager
Here is an interesting tidbit you may not have been aware of; the PropertyManager can be moved. It can also be turned off so it does not automatically show when items are selected. Let’s talk about moving it first.
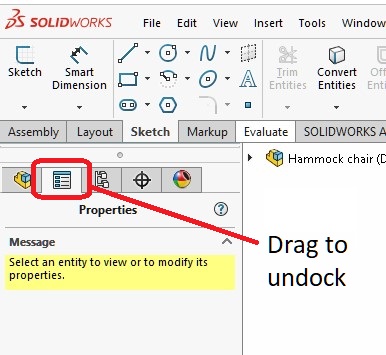
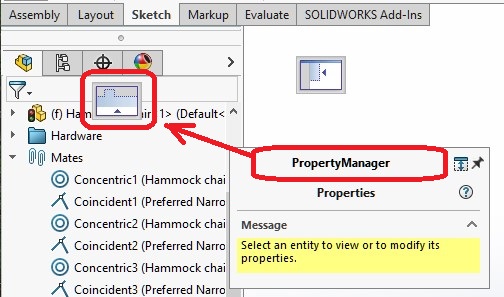
To move the PropertyManager, drag it by it’s tab, as shown in the above image. Go on and try it, you know you want to! Try dragging it’s tab into the graphics area. No worries, if you don’t like it undocked, we will move it back.
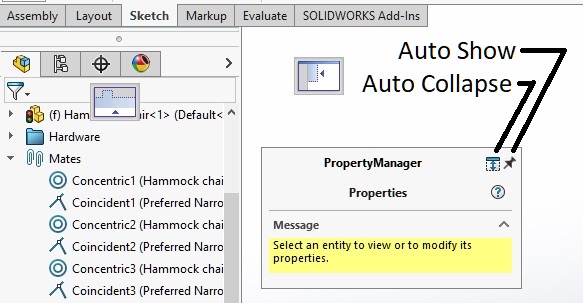
Once the PropertyManager is free from it’s anchor, you will notice a few small symbols near the top of the PropertyManager. There is a pin, which will keep the PropertyManager visible. There is also an Auto Collapse option, which will make the PropertyManager function in a similar fashion to the Task Pane.
To dock the PropertyManager, drag it by it’s title bar. Similar to the CommandManager, symbols will appear that indicate where the PropertyManager can be docked. In the case of the PropertyManager, there are 4 docking positions. These locations are bottom left or right of the SOLIDWORKS window, top left of the graphics area, and the default location. The image below shows where to drop the PropertyManager if you wish to return it to it’s default location.
Careful! If Auto Show is enabled, the PropertyManager will disappear. To get it back, initiate any command that uses the PropertyManager, and it will reappear. (The Plane command, for instance.)
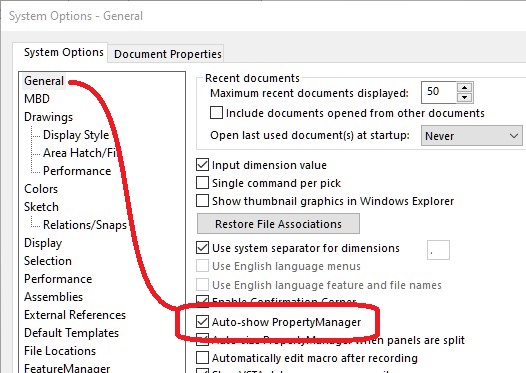
There is a similar setting in the SOLIDOWORKS System Options (Tools menu > Options > System Options tab > General section) titled “Auto-show PropertyManager”. This setting only affects the PropertyManager when it is docked. If turned off, the PropertyManager tab must be selected in order to view it. This is not a setting most people would ever want to turn off.
Recovering Hidden Windows
The last topic I will discuss is my all time favorite hot key combination. It can be used for recovering a missing SOLIDWORKS Measure window, the Orientation window, the Materials database window, or nearly any other SOLIDWORKS command window that is located off the screen. Incidentally, this type of “hidden window” issue can occur when sharing settings between computers where one computer has multiple monitors and the other computer does not. A SOLIDWORKS command window can be displayed on a second monitor that is not present on a second computer.
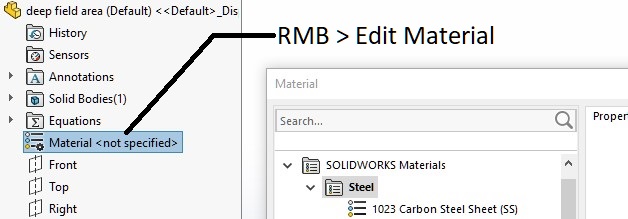
First, let’s get you set up so this hot key combo can be seen in action. What I am about to illustrate will work for any window in the Windows operating system, but let’s use SOLIDWORKS for the example. With any SOLIDWORKS part open, right click Material in the FeatureManager and select Edit Material. This will open the Material database window. Feel free to position the window anywhere. If you have more than one monitor, feel free to position it on a different monitor.
Make sure the Material database window is active, meaning you have not clicked anywhere else after positioning the window. This will simulate having just tried to access the Material database. We’ll use our imagination and pretend we can’t see it and it’s off screen.
Ready?
Hold down the Alt key and tap the spacebar, then let go of the Alt key. This action will open a menu in the top left corner of the Material window.
Next, tap the M key. This will select Move in the aforementioned window.
Tap any one of the arrow keys. It doesn’t matter which one. This has the effect of “attaching” the window to your cursor.
Finally, try moving your mouse. The Material window should be attached to the cursor.
Now all that is left is to click where you would like to place the window.
In summary, that combination is Alt-Spacebar > M > Arrow.
Hope you enjoyed this tech tip, and Happy Modeling!