Controlling Options When Using A Network License
The SOLIDWORKS SolidNetwork License Manager may have more capabilities than you realize. Using an options file can control which users or departments have access to the various licenses owned by your company. At the end of this article, an example will be given that will show how easy it really is to create your own options file.
Options File Capabilities
Options files are very easy to create and deploy and can be used wherever a SOLIDWORKS network license exists. The main reason for using an options file is to control who gets to use which licenses. There is the ability to either include or exclude users or groups from specific licenses. Licenses can be reserved for specific users or groups, ensuring they will always have access to specific licenses. Whether certain users or groups can borrow licenses, or for how long, is also possible.
Having more control over license manager log files is another benefit of an options file. This article gives a general introduction to using options files with the most commonly used functions. The full list of capabilities are available in the FlexNet License Administration Guide. To access this guide, look for the Support link on the My.Solidworks.com website.

Options File Preparations
It is important to collect a few bits of data prior to creating an options file. This will include the names of the people using the various SOLIDWORKS and related product licenses, what the group names should be, and a list of all products owned that are being served under the SolidNetwork License (SNL) Manager.
Setting Up Users And Groups
A good place to start is to list the names of every individual using a license (or licenses). Include their Windows login username, because that is what will be used in the options file.
Write out names of groups the licensing should be controlled for, such as Engineering, Analysis, Admin, and so on. This is not a requirement, but if there are a large number of users that need to use specific licenses, group names make managing the options file easier.
SNL Manager Licenses
List out all of the SOLIDWORKS licenses and quantities (sometimes referred to as “seats”) of each license type owned. This should include version, bundle or package names. Include ancillary product licenses as well. In short, any product license being served by the license manager should be in the list.
Examples of product names (including seat count) are shown in the following list. We will also use this product list in the example near the end of this article.
- SOLIDWORKS Standard (3)
- SOLIDWORKS Premium (2)
- SOLIDWORKS Electrical Schematic Professional (1)
- SOLIDWORKS Simulation Premium (1)
- SOLIDWORKS PDM Professional CAD Editor (6)
- SOLIDWORKS PDM Professional Viewer (3)
SNL Manager Feature Names
The FlexLM licensing service uses aliases to differentiate between products. These are known as “feature names”. Some of these feature names have been around a while. Because of this, they will occasionally seem odd when compared to their associated product names. The feature names were created when some products had different names. The feature names can’t be changed, because it would cause older options files to stop working for those products.
Here are examples of feature names for the products listed above:
- SOLIDWORKS Standard - solidworks
- SOLIDWORKS Premium - swofficepremium
- SOLIDWORKS Electrical Schematic Professional - elec2d
- SOLIDWORKS Simulation Premium - cae_cwadvpro
- SOLIDWORKS PDM Professional CAD Editor - swepdm_cadeditorandweb
- SOLIDWORKS PDM Professional Viewer - swepdm_viewer
Of course, there are many more products than what is listed here. For the full list of feature names, search the knowledge base for solution ID #S-068783.
Options File Commands
Now that the prep work has been done, we can start putting the options file together. The command names are basic and the syntax is very straightforward. The example shown here will use a handful of the more commonly used commands. As previously stated, there is a full list of commands in the FlexLM End User Guide.
The commands we will use, with syntax and descriptions, are as follows:
GROUP group_name user_list - defines a group of users.
GROUPCASEINSENSITIVE on/off - turns case-sensitivity on or off (default is off).
INCLUDE feature_name (user_name / group_name) - allowed to use licenses for this feature name.
RESERVE feature_name (user_name / group_name) - reserves license for this feature name.
Writing The Options File
For our example, we will make up some users and give them job descriptions. We will be on a first name basis only, and will assume the users first name is also their Windows login username.
The engineers using SOLIDWORKS are Ronald, Raymond, Richard, Shirley, and Marilyn. Joseph works with the electrical software creating schematics. He is the only one who will be using that license, so it will be reserved for him. Joseph will not be using SOLIDWORKS, but he will be storing his data in the PDM vault.
Raymond will be doing all of the advanced simulation studies, and will need access to Simulation Premium. Ronald and Richard will use the Routing add-on, which is part of SOLIDWORKS Premium, and will need access to those licenses regularly.
The PDM CAD Editor licenses will all be used by the engineers. The fabricators on the shop floor are Sophia, Gabriella, and Eva. They will need to view released drawings in the PDM vault, so should have access to the PDM Viewer licenses.
Let’s create the groups first. We will need one for the engineers, and one for the fabricators. We will also turn off case-sensitivity (or turn on case-insensitivity). Use a simple text editor such as Notepad for creating your options file.
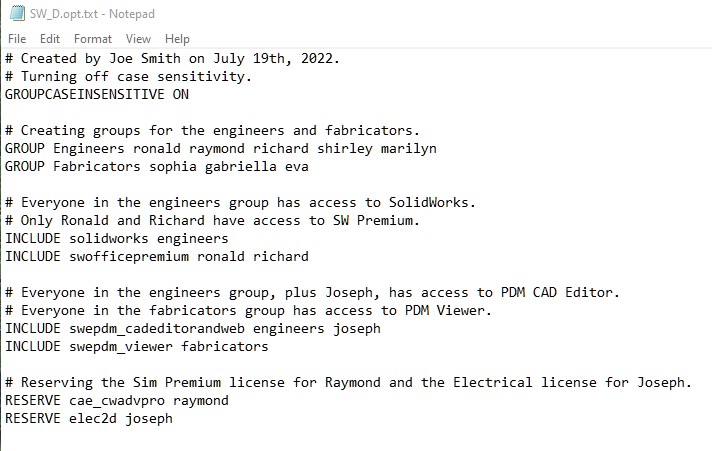
GROUPCASEINSENSITIVE ON
GROUP Engineers ronald raymond richard shirley marilyn
GROUP Fabricators sophia gabriella eva
Next, let’s make sure the proper users and groups get access to the proper licenses.
INCLUDE solidworks engineers
INCLUDE swofficepremium ronald richard
INCLUDE swepdm_cadeditorandweb engineers joseph
INCLUDE swepdm_viewer fabricators
All that is left is to reserve the Simulation Premium license for Raymond and the Electrical Schematic license for Joseph. We could just as easily use the INCLUDE command for this. The difference is INCLUDE grants access to any user or group listed. RESERVE allows access for the one user or group only. Use INCLUDE if access will be shared.
RESERVE cae_cwadvpro raymond
RESERVE elec2d joseph
Employing The Options File
At this point, your options file will be nothing more than a simple text file with a few lines of text. Do yourself a favor and add comments. Any line that begins with a number sign will be ignored and is considered a comment. Here is what our finished options file looks like in Notepad.
In order to make this work, the file must be saved with the appropriate name. It should also be saved at the correct location so the license manager will “see” it. (Technically, this is not true. The file location is not critical, but it is good practice to place it at the location specified in this article.)
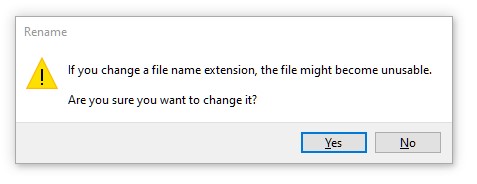
Name the file “SW_D.opt”. Windows may try to retain the “txt” extension like it did in Image 3. (Look near the top of the image to see the filename.) Don’t let it! If Windows gives you a warning about the file becoming unusable (like in Image 4), it doesn’t matter. Click Yes anyway.
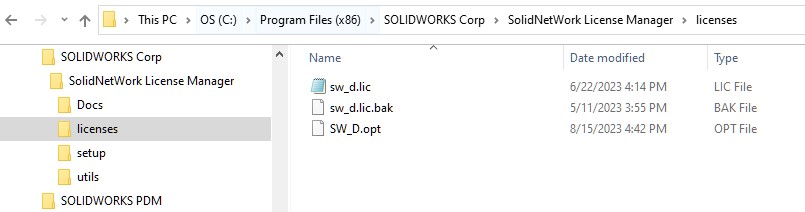
Place the options file in the “licenses” folder where the license manager was installed. Under normal circumstances, the path will be “C:\Program Files (x86)\SOLIDWORKS Corp\SolidNetWork License Manager\licenses”. Image 5 shows a screen capture of this location containing the options file with it’s new name of SW_D.opt.
Trigger The License Manager Service
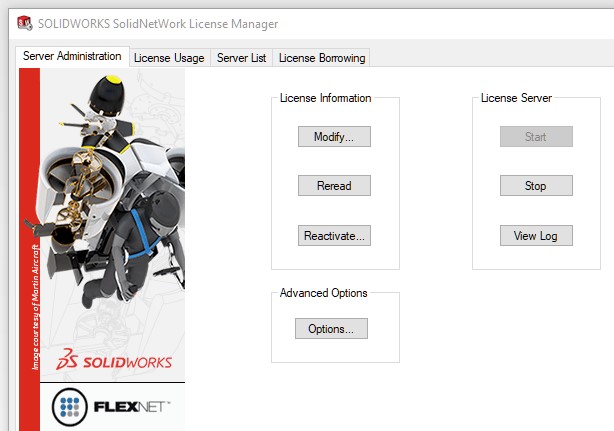
There is only one thing left to do. Open the SolidNetwork License Manager Server application, then Stop and Restart the license server so it will read the options file and start using it. By the way, it’s probably best to make sure no licenses are out and in use at this point in time. Use the License Usage tab (visible in Image 6) to ensure no licenses are currently out.
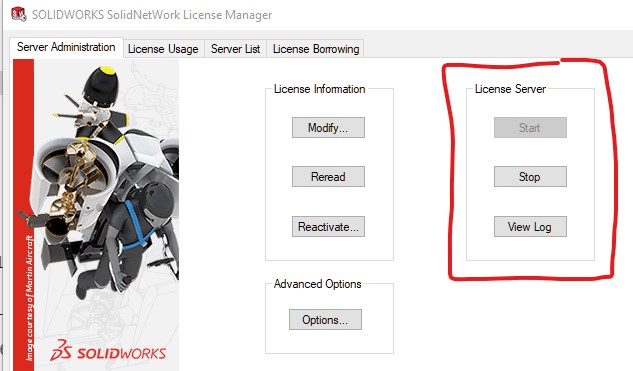
To stop the license server, click the Stop button shown in Image 6. Wait a few seconds, then click Start. Your options file will start being utilized right away.
If troubleshooting becomes necessary, simply rewrite the options file and then stop and restart the license server. To stop using the options file, delete it, then stop and restart the license server.
Have fun writing your own options file, and Happy Modeling!